Setting Up Auth0 Application
In this chapter, you will learn how to secure applications running on Kubernetes with Istio and Auth0.
Before start working on this, you need to
- Verify that you are exposing port 80 for the bookinfo application using a Gateway resource.
- Configure the ingress gateway to route traffic to your bookinfo services, and you do that using a VirtualService resource.
Routing Traffic to Services Using An Istio Gateway
Remember you created the bookinfo-gateway resource in the "Expose a Service" section under the "Traffic Management" chapter.
kubectl get gw bookinfo-gateway -n test -o yaml
Output:
apiVersion: networking.istio.io/v1beta1
kind: Gateway
metadata:
  annotations:
    kubectl.kubernetes.io/last-applied-configuration: |
      {"apiVersion":"networking.istio.io/v1alpha3","kind":"Gateway","metadata":{"annotations":{},"name":"bookinfo-gateway","namespace":"test"},"spec":{"selector":{"istio":"ingressgateway"},"servers":[{"hosts":["*"],"port":{"name":"http","number":80,"protocol":"HTTP"}}]}}
  creationTimestamp: "2022-10-21T02:22:31Z"
  generation: 1
  name: bookinfo-gateway
  namespace: test
  resourceVersion: "3949235"
  uid: 743de076-c22e-4152-af84-cc69a2fa0f74
spec:
  selector:
    istio: ingressgateway
  servers:
  - hosts:
    - '*'
    port:
      name: http
      number: 80
      protocol: HTTP
If you did not find this gateway resource exist, you can apply it to your cluster by executing the following command.
kubectl apply -n test -f - <<EOF
apiVersion: networking.istio.io/v1alpha3
kind: Gateway
metadata:
  name: bookinfo-gateway
spec:
  selector:
    istio: ingressgateway
  servers:
  - port:
      number: 80
      name: http
      protocol: HTTP
    hosts:
    - "*"
EOF
The definition above will only be applicable to workloads that match the selector. The default ingress gateway that was installed with Istio is the only one that the selector istio: ingressgateway matches for.
The Istio ingress gateway accepts traffic on port 80 for any host once this Gateway resource has been applied.
Defining a virtual service for your application
After admitting traffic in your cluster, you need to configure the ingress gateway to direct traffic to your bookinfo services, and you do that using a VirtualService resource.
The following VirtualService rules instruct your gateway to direct incoming traffic over the listed endpoint paths, to the productpage service:
kubectl apply -n test -f - <<EOF
apiVersion: networking.istio.io/v1alpha3
kind: VirtualService
metadata:
  name: bookinfo
spec:
  hosts:
  - "*"
  gateways:
  - bookinfo-gateway
  http:
  - match:
    - uri:
        exact: /productpage
    - uri:
        exact: /login
    - uri:
        exact: /logout
    - uri:
        exact: /callback
    - uri:
        prefix: /api/v1/products
    - uri:
        prefix: /static/
    route:
    - destination:
        host: productpage
        port:
          number: 9080
EOF
You expose crucial functionalities using these endpoints. For this chapter, the important ones are:
- /productpage: This is the primary endpoint of the bookinfo application that you hit in your browser.
- /login: Once Auth0 has been integrated into your app, this endpoint will redirect users to the Auth0 login page so they can sign in or sign up.
- /logout: Users will use this endpoint to log out of your app.
- /callback: This endpoint is used by Auth0 to redirect the user back to your app after they log in. When this occurs, your application receives a code. Then, your application exchanges this code to obtain the access token.
After running this command, you can access your application in your browser by hitting the endpoint /productpage using the loadbalancer endpoint of the ingress-gateway service located in the namespace istio-system as you did in the previous chapter.
export ISTIO_IG_HOSTNAME=$(kubectl -n istio-system get service istio-ingressgateway -o jsonpath='{.status.loadBalancer.ingress[0].hostname}')
echo $ISTIO_IG_HOSTNAME/productpage
Output:
ac8bed13fd78247e995b42664063ce47-1403049919.us-east-1.elb.amazonaws.com/productpage
 Notice here that you can see book details and reviews displayed on the page without even logging with any users yet.
Authenticating and Authorizing Users
Now, in order to put access control policies into practice for the services you need to nitially redirect the user to Auth0 for authentication and then configure the services with rules that accept or reject requests based on user permissions, as follow.
- The productpage service is accessible by any user.
- The reviews service is accessible by identities with the read:book-reviews permission.
- The details service is accessible only by identities with the read:book-details permission.
- The ratings service has no policies applied, so it is accessible by any user; but you can restrict it as well if you want.
You will have 3 category of users:
- Admins: which can access all services.
- Users: which can only access the productpage and details services.
- Unauthenticated users: which can only access the productpage service.
Setting up the Auth0 application
Let's start to configure Auth0 to authenticate users for our services. First, you need to sign up for a free Auth0 account, if you do not have one already.
Following the sign-up, you navigate to the Applications section of your dashboard and select the Create Application button. Auth0 will then display a dialog box for you to enter the following two items:
- Application Name: The name of your application can be anything here. You can use something like istio-auth.
- Application Type: Choose Regular Web Applications.
Then, when you click on Create, you will be directed to the Quick Start tab of your new application. After that, you select the Settings tab and modify the following two fields:
- Allowed Callback URLs: In here you enter the URL that Auth0 will call after users authenticate. Here, you enter
http://{ISTIO_IG_HOSTNAME}/callback. - Allowed Logout URLs: In here you enter the URL that Auth0 will call after users log out. Here, you enter
http://{ISTIO_IG_HOSTNAME}/productpage.
Then hit the Save Changes button.
Registering an API in Auth0
Navigate to the APIs section and click on Create API. Then, Auth0 will then display a dialog box for you to enter the following items:
- A Name for your API: You can name it anything, but let's name it as the application name (istio-auth).
- An Identifier for your API: Use a URI like https://istio-auth. It doesn't have to be a valid URL. It will not be called.
- A Signing Algorithm: Use RS256.
Once you create the API, you will be directed to its configuration page. here, you configure the API to add permissions to the access token after a user logs in. Follow these steps:
- Hit the Settings tab and scroll down to RBAC Settings.
- Enable both the
Enable RBACandAdd Permissions in the Access Tokenoptions. Then, scroll down to Save. - Next, hit the Permissions tab and add the following two permissions:
| Permissions | Description | | : --------------- | : -------------- | | read:book-details | Read book details | | read:book-reviews | Read book reviews |
Defining roles and assigning permissions
Users can be assigned permissions directly. However, creating roles that group a set of permissions is a preferable approach. A user will receive the same set of permissions when this role is assigned to them.
To define roles, navigate to the User Management > Roles section, and create the two roles shown below, and assign the following permissions to each, by clicking the role and heading to the Permissions tab:
| Roles | Assigned Permissions | |:-- | : -- | | user | read:book-details | | admin | read:book-details, read:book-reviews |
Creating users and assigning roles
Head over to the User Management section and create the following users and assign the appropriate role to each:
| Usernames | Assigned Role |
|---|---|
| test-user | user |
| admin-user | admin |
To assign roles after creating the users, you need to click the user. Then switch to the Roles tab, where you can assign the listed roles.
Head back to the Applications section and open the application you created above. Leave this page open as you will need to copy some values from it in the next steps.
Validating the Access Token (RequestAuthentication)
Users who successfully verify their identity and authenticate using Auth0 are given an access token in JWT format. To verify JWT tokens, Istio offers the RequestAuthentication custom resource. So just like the use of SPIFEE identity to authenticate services, we use JWT tokens to authenticate users.
This RequestAuthentication resource is used for end user authentication and it verifies the credentials that are attached to the request. This resource applies to all workloads in a namespace or you can make it particular to specific workloads within a namespace with specific labels.
Any request made to these workloads will need a JWT token on the request (in the header).
The jwksUri field is where you point to the public key that can be used to authenticate the token and the signature.
Let's deploy the following RequestAuthentication resource after replacing placeholders called your_auth0_nickname with your own Auth0 nickname.
kubectl apply -n test -f - <<EOF
apiVersion: security.istio.io/v1beta1
kind: RequestAuthentication
metadata:
  name: "auth0"
spec:
  # selector:
  #   match9labels:
  #     app: details
  jwtRules:
  - issuer: "https://your_auth0_nickname.us.auth0.com/"
    jwksUri: "https://your_auth0_nickname.us.auth0.com/.well-known/jwks.json"
EOF
Now, if the request to this specific workload does not contain a valid JWT token, the token is not going to conform to those rules, and the request will be rejected.
On the other hand, if we do not provide a token at all, the request will not be rejected, it just won't be authenticated.
Now, if you you refresh the productpage app, you will see that the page still accepts requests without access tokens. That's because we didn't redirect users to Auth0 to authenticate themselves yet.
Authenticating User Requests with Auth0
Next, you will update the productpage application to redirect users to Auth0 for authentication. The updated app retrieves the Auth0 credentials from environment variables that can be set using a Kubernetes Secret.
Execute the following command to create this secret after replacing the following placeholders with the appropriate values of your own Auth0 application and API and the hostname of your Ingress-gateway loadbalancer.
kubectl apply -n test -f - <<EOF
apiVersion: v1
kind: Secret
metadata:
  name: app-credentials
type: Opaque
stringData:
  AUTH0_CALLBACK_URL: http://{ISTIO_IG_HOSTNAME}/callback

  # Auth0 Application properties
  AUTH0_CLIENT_ID: {YOUR-AUTH0-APPLICATION-CLIENT-ID}
  AUTH0_CLIENT_SECRET: {YOUR-AUTH0-APPLICATION-CLIENT-SECRET}
  AUTH0_DOMAIN: {YOUR-AUTH0-APPLICATION-DOMAIN} # your_auth0_nickname.us.auth0.com

  # Auth0 API properties
  AUTH0_AUDIENCE: {YOUR-AUDIENCE} # The Auth0 API audience/identifier like https://istio-auth
EOD
Next, update the productpage deployment with the new image redirecting to Auth0 for authentication and setting its environment from the previously created secret:
kubectl -n test patch deployment productpage-v1 --patch "
spec:
  template:
    spec:
      containers:
      - name: productpage
        image: rinormaloku/productpage:istio-auth0
        envFrom:
        - secretRef:
            name: app-credentials
"
Important Note
To get an idea what exact changes happened to enable this productpage to redirect users to Auth0 for authentication checkout the following two pages:
https://shorturl.at/fkoyT
https://shorturl.at/lrsx3
Wait until the updated pod is running, then refresh the productpage application page in your browser and hit the Sign In button. It will redirect you to the Auth0 login page, where you will be able to sign in.
After the authentication, the end-user is redirected to the productpage application with the access token. This token is sent to the productpage, which uses it when requesting other services, which then can apply policies based on the permissions of the identity.
Authorizing end-users with Istio
In this section, you'll create policies that allow access to services based on the permissions claim of the token.
Policies in Istio are defined using the AuthorizationPolicy custom resource. For example, with the policy below we allow users with the permission read:book-details to access the details service:
kubectl apply -n test -f - <<EOF
apiVersion: "security.istio.io/v1beta1"
kind: "AuthorizationPolicy"
metadata:
  name: "details-policy"
spec:
  action: ALLOW
  selector:
    matchLabels:
      app: details
  rules:
  - when:
    - key: request.auth.claims[permissions]
      values: ["read:book-details"]
EOF
Remember that we can apply this policy to any of the services. However, using the selector app: details we apply it specifically to the details service.
The following policy allows access to the reviews service only for users with the permission read:book-reviews:
kubectl apply -n test -f - <<EOF
apiVersion: "security.istio.io/v1beta1"
kind: "AuthorizationPolicy"
metadata:
  name: "reviews-policy"
spec:
  action: ALLOW
  selector:
    matchLabels:
      app: reviews
  rules:
  - when:
    - key: request.auth.claims[permissions]
      values: ["read:book-reviews"]
EOF
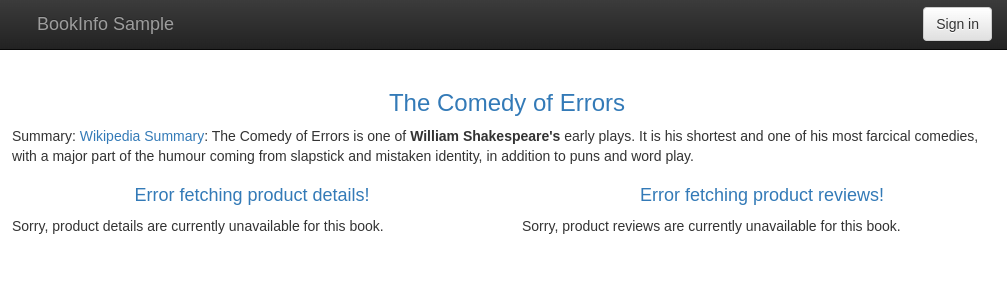
Wait a few seconds for the policy to be applied to the services. Then refresh the productpage in your browser and you will see that it shows two "error fetching ..." messages. This means that your policy is enforced and that the productpage microservice was unable to fetch the product details and the product reviews for an unauthenticated user.
Next, verify that after logging in with the credentials of the user test-user, you'll be able to access the product details but not the reviews!
When you log in with the credentials of the user admin-user, you will see that both services are queried successfully! That's because the admin role has both permissions.